skip to main |
skip to sidebar
 It felt like construction actually began today. We mixed our first epoxy and glued a few things together. First we primed the epoxy resin and hardener pumps, then put a liquid coat of resin/hardener mix onto the surfaces that were to be glued. That liquid plastic soaks into the wood and helps hold everything together really well. Once that was brushed on, we mixed up the resin and hardener and added the silica, which turns the liquid into a goop, from really runny to really hard, like putty or peanut butter as the epoxy manual describes one of the desired textures. The desired texture for our purposes today was mayonnaise. We slopped the glue onto frame 1 where the doublers go and onto a 20x20 cleat (a little block that another piece of wood will be screwed into). We were also gluing together the two halves of the centerboard, along with the puzzle piece that we made when we ran out of wood.
Dealing with epoxy calls for chemical hazard measures - gas mask, latex gloves, sleeves, clothes you will most likely be discarding at the end of the process. Apparently some people have really bad reactions to the epoxy when they're exposed to it, and reactions can become so bad that a person cannot be exposed to it again. We don't want that to happen, so we're taking all the precautions to not get it on the skin or in the lungs. Also the tools get all epoxied-up which is not too good for the new drill, but there's not much of a way around that I guess.
 Once the glue is on and the doublers are in place, they have to be held in place while the epoxy cures, or hardens. We used nails (and screws in a few cases, on the cleat and the centerboard), which are basically acting as clamps until the epoxy dries, but won't be coming out again.
  Here's frame 1 with doublers and the cleat (top middle of frame) glued on. It makes quite a mess, and this is only the beginning! Glue slides out all the edges, just like when you're gluing paper as a kid and getting Elmer's all over your fingers. We try to save the stuff that's seeping out by scraping it off and using it to fill nooks and crannies that need to be filled. For example, on the centerboard where our puzzle piece meets the main piece of wood there's a slight gap, so we pushed as much glue into that as we could. It is also a very disposable process, involving many mixing cups that will go in the trash along with countless gloves, brushes, stir sticks, etc. Too bad.
 And the centerboard held together with screws, nails, and clamps (or cramps as the British call them). It could take up to 48 hours for it to cure, when we can take off the clamps and proceed on.
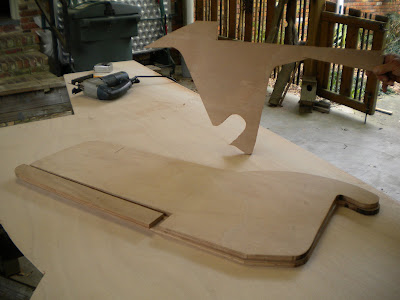 Horror. Averted. No need to make a trip to Panama City, and looks like our centerboard will be strong even though it's in a couple pieces. We were able to get most of the second half in one large piece with only a small, long cutout. Made the missing piece by tracing with paper - this paper model method works really well. And in the process we created a roadrunner scrap! Yet, this will potentially also be cut up to use for other parts.
Today we also cut out a few more notches that were invisible on the designs and began making the 20x20mm doublers that will be attached to each frame, the bottom rails and the seat top supports that the bottom and seat planks will be attached to. The bottom rails and seat top supports are at slight curves, so we used clamps to hold the wood along the desired curve, then pre-drilled at 100mm (approximate) intervals. Screws will be countersunk, connecting the 20x20 softwood strips to the plywood. Got to use the new drill/screwdriver a bunch - it works well and is nice and lightweight.
 Shadow read the plans to us - she understands them about as well as we do most of the time.
Horror.
Those arms I wrote about, ingeniously crafted with tracing paper and tediously cut out, they could be our downfall. We worked so hard last weekend laying out the arms on the 12.5mm plywood sheet, making sure to conserve wood, spacing the arms to waste as little wood as possible.
We have only one sheet of 12.5mm. Today we were ready to draw and cut the centerboard, which consists of two 12.5mm pieces glued together for strength. But there in front of us on our diced-up sheet of 12.5mm we could see that there was only enough wood for one full-sized centerboard piece.
As I mentioned before, plywood, marine plywood, can't be purchased in Tallahassee. We should have looked ahead through all the plans and made an inventory of what parts would be cut out of what wood and had a better idea of how to conserve the right size pieces of plywood. Because while we thought we were doing really well at not wasting any wood, we were going about it in the wrong fashion. Our arms should have been cut out after we saved room enough for the relatively large centerboard pieces.
So we are either going to try making a laminate for half of the centerboard (gluing together smaller pieces of wood to make the whole), or a trip to Panama City might be in the works. That is the nearest source of marine plywood. We were fortunate enough at the beginning of the project to have the man from PC deliver our wood on his trip up from south Florida where he buys the wood.
On a happier note, today I cut out the other half of the centerboard case, and it came out the same size and approximately the same shape as the half on the spine. A little sanding on the corners matched it right up with its other half.
 We finally have something resembling a boat!It took a couple good days of tracing and cutting. We drew (twice) and cut out (once) the spine, which is one big piece of 9mm plywood from the bow to the centerboard case, or centreboard if you're speaking British english. Then the frames we'd already cut out notched onto the spine, but we noticed that frame 3, the farthest one back in the top picture didn't have a notch to fit onto the spine. The plans hadn't called for a notch. Up till now, while the plans may have been unclear or vague to the novice builder, they were specific enough in the measurements so that anyone with a bit of sense could draw out the designs on wood. Now, though, we have started to come across blatant emissions or errors that are throwing us curve balls. First was this missing notch. Obviously the frame needs a notch to attach to the spine; this was clarified from an experienced boat builder in Texas that has responded to our emails full of questions. (John Welsford down in New Zealand is hard to get hold of). Next we realized that on the spine plan, we had followed the design with a 10 mm notch at the bottom, meant to fit up against the 9mm plank that will be the bottom of the boat. But looking onward, another part of the plan calls for 12.5 mm ply on the bottom of the boat. So which is it? This is important, as we found out today, because we bought the minimum sheets of plywood called for, and this marine plywood can't be purchased in Tallahassee (plus it's expensive). Well, we're going with the 9mm for the bottom. While we may be slightly discouraged by these design flaws, I am confident that we'll figure them out and put our boat together regardless.
  Cutting is tedious most of the time. It has to be done well, to a certain extent it seems, so that pieces come out the right size. To a certain extent because epoxy can fill any spots that aren't fitting perfectly, and will fill any and all spots. It's nice cutting with two people - one holds the light and blows away sawdust that's covering the lines, and there's relief when the arms get tired. A sharp blade helps, too. We cut out all of the arms along with the spine and remaining doublers. The arms are what we used the double sheets of paper for - the ones I mentioned in the last post and wasn't sure how we would use them. The top sheet with full drawing lays in wait as a template for putting the parts together. The bottom sheet that I punched holes into has been cut up into parts for tracing. We connected the dots (the punched holes) to re-draw the arms, then cut out those arms, traced the outline of the paper arms onto 12.5mm plywood, and then cut out the wood to make our real arms. Ingenious!
  Daddy with the beginnings of the boat, holding the transom (the very back of the boat, hole for the tiller to come through). The holes in frames 2 & 3 are just for air flow, and the space between those two frames is where the centerboard will be. That space will be decked over to create one big seating area. Up in the bow will be flotation (enclosed air space) with an inspection port in frame 1.
 It felt like construction actually began today. We mixed our first epoxy and glued a few things together. First we primed the epoxy resin and hardener pumps, then put a liquid coat of resin/hardener mix onto the surfaces that were to be glued. That liquid plastic soaks into the wood and helps hold everything together really well. Once that was brushed on, we mixed up the resin and hardener and added the silica, which turns the liquid into a goop, from really runny to really hard, like putty or peanut butter as the epoxy manual describes one of the desired textures. The desired texture for our purposes today was mayonnaise. We slopped the glue onto frame 1 where the doublers go and onto a 20x20 cleat (a little block that another piece of wood will be screwed into). We were also gluing together the two halves of the centerboard, along with the puzzle piece that we made when we ran out of wood.
 Once the glue is on and the doublers are in place, they have to be held in place while the epoxy cures, or hardens. We used nails (and screws in a few cases, on the cleat and the centerboard), which are basically acting as clamps until the epoxy dries, but won't be coming out again.
  Here's frame 1 with doublers and the cleat (top middle of frame) glued on. It makes quite a mess, and this is only the beginning! Glue slides out all the edges, just like when you're gluing paper as a kid and getting Elmer's all over your fingers. We try to save the stuff that's seeping out by scraping it off and using it to fill nooks and crannies that need to be filled. For example, on the centerboard where our puzzle piece meets the main piece of wood there's a slight gap, so we pushed as much glue into that as we could.
  And the centerboard held together with screws, nails, and clamps (or cramps as the British call them). It could take up to 48 hours for it to cure, when we can take off the clamps and proceed on.


