Thursday, October 27, 2011

10-27.

Fairing.
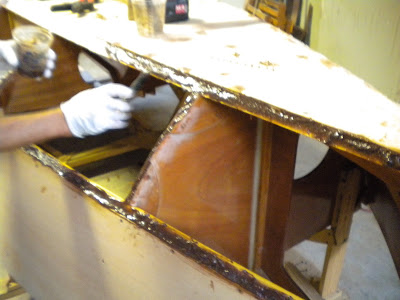
The fairing epoxy has a totally different consistency than the regular silica that we use for gluing.  Described as peanut butter, it's really more like a putty.


Daddy did the port side yesterday and sanded it down this afternoon to see how it turned out.  It looks good and feels smooth - no more of the little bumps all along the edges of the fiberglass and no more rough, gouged out places in the wood.  

Spreading the fairing on was pretty simple.  We just globbed it on, spread it thoroughly along the fiberglass edges or other spots that needed filling, and then feathered out the edges to reduce sanding when it dries.  


Here's the transom and back end of the boat covered with the fairing putty.  This weekend we'll sand it down and then start putting on more coats of liquid epoxy.  We're also starting to look at colors for the boat.    The suggestion box is open if anyone has any ideas!  We're considering a pale yellow with dark blue trim or a pale greenish color (called blue ice) with either a dark blue or dark green trim.  The interior (seats/decks) will most likely be a creamy, off-white color.  I'm leaning towards a white or off-white sail - my dad's boats have red sails that I'm not too fond of.


Tuesday, October 25, 2011

10-16, 10-25.

Glassing the bottom and seams, and coating the hull with liquid epoxy took most of a day to do.  We had to wait for a sunny day - rain had already pushed us back once or twice and hot weather was also prohibitive because of the epoxy hardening too fast.  We wanted to have a full day to work on this so that we could put down the fiberglass and then coat it with three layers of epoxy in succession to ensure chemical bonds between the epoxy, instead of just physical bonds.  By adding the next layer of epoxy as the previous is just starting to dry (feels "tacky"), the chemicals create a stronger bond when they harden.  


First we laid the dry fiberglass down on the boat to make sure it fit.  We cut out pieces to cover the bow and cut the big back piece to fit along the skeg.  Then we put the cloth aside and painted the wood with a coat of liquid epoxy everywhere the cloth would touch.  We've only been using the wet method of fiberglassing since my dad thinks it makes it easier to get the cloth set in place - which it does seem conceptually easier (since I haven't tried the dry method of not wetting the wood before laying the cloth down).  Anyways, once we painted the wood, we laid the fiberglass cloth back down, one piece at a time and slowly and methodically pushed it into place, pouring more epoxy on top of the cloth.  We used plastic scrapers to spread the epoxy evenly on top of the cloth - the trick is to get the epoxy to soak through the cloth so that the cloth becomes invisible, but not to use too much epoxy.  The other trick is to not work the cloth too much with the scraper because air bubbles start to form under the cloth.  Fiberglassing is fun and not too difficult, although the gas mask can give a person a headache if the straps are too tight.


Pouring the liquid epoxy onto the cloth.


Scraping it along, smoothing it in through the fiberglass.  The pieces we used in the bow were a different thickness and weave than the ones along the rest of the bottom which made it much harder to get the epoxy through the cloth - it took a lot more working and scraping.  We ended up putting several layers of fiberglass on the bow area to make it extra protected.


Here's the boat with fiberglass applied.  By the time we finished attaching all of the fiberglass to the seams, the stuff was getting tacky on the bottom, so we moved straight on to painting the entire hull with another coat of liquid.


Cutting a dart to make the cloth fit around a corner.  I think we might have ruined three pairs of scissors this day.  (Well one pair had already seen their demise from previous epoxy and fiberglass adventures, so we had to steal some more from the house).


Tonight (10-25) we sanded the hull to prepare for fairing.  Daddy had already sanded one side, so we just worked on the other side and all the epoxy humps and bumps and borders.  I used the fun little vibrating sander to get the wood and  smoother fiberglassed areas and Daddy used the big hulking belt sander to get the fiberglass edges that were really sticking out and the overlapping fiberglass areas that were really thick and bumpy.


Last time I had to wear a hazmat suit was spraying reed canary grass up in Minnesota with blue-dyed round up - not fun.  This time around is way better!!  And it is really nice to wear these when sanding because you get totally covered in super fine particle dust, which with fiberglass and epoxy in the mix is not something particularly nice to have stuck all over your clothes and exposed skin.

After we finished sanding, we vacuumed the boat to get the obvious dust off, then we used special scrubbers (sort of like the non-scratch abrasive pads for pots and pans) with water to take off the amine blush and lightly sand while removing the hiding particles.  Then to be extra sure we were getting all the particles off, we went back over the boat with wet rags, then dry rags.  We might have to repeat this sanding and washing process again after we get a look at the boat in the daylight to see if there are any patches that we missed.  Once that is done, we will move on to fairing - fixing the imperfections of the fiberglass edges and places I gouged out when sanding earlier on.

Thursday, September 29, 2011

9-29.

Sanding down all the epoxy mess.  I am the abominable sander - I'm super good at gouging out the plywood above or below where I'm actually supposed to be sanding.  I wish they made a petite sander to go with the petite drill we bought for this project.  This belt sander is massive and weighs a ton!
 

Sanding on top of the boat is fun and scary.  The sander wants to pull me right off the edge when it starts.  Now we have a nice clean-looking hull, just the bow remains to be worked on.  And there are lots of imperfections left to fix from my terrific handling of the sander.  Then we can slap the fiberglass on. 


Tuesday, September 27, 2011

9-27.

Avast there she'll float - a hull! 


Gooping on the glue.  Of course we ran out of 406 silica after starting to glue, so we had to switch to 405 (the chocolaty icing) which is supposed to be for filleting (see the white vertical line of epoxy running the length of the spine where the frame and spine meet - that's a fillet).  There's no stopping once you've gotten started, and you have to work fast before the glue dries - tonight we were finishing clean-up and filling in countersunk screw holes with really really viscous epoxy.  When the port bow chine panel springs a leak we can blame it on the 405 silica.
 

Tonight was a bittersweet evening.  These are the last views we'll have of the innards of the boat from this angle.   


 From here on out she'll look like a Boat!


So as you may have noticed in the previous post, the boat has already looked like this during the dry fit.  Everything was all lined up and fitting pretty (pretty sloppy, but what good is epoxy for but to fill all those gaps!)  Anyhow, as we screwed down the last chine panel, all of a sudden the pre-drilled holes in the plywood weren't matching up with the holes in the stringers below.  Which meant that the plywood panel wasn't lining up with the bottom or side panels, or with the other chine panel at the bow.  This was a problem - the bow especially needs to line up so the boat isn't totally off-centered!  We managed to get the holes to line up with Daddy putting lots of pressure on the plywood while I quickly screwed it down hole by hole, progressing forward, checking that the screw holes lined up with a loose drill bit.  Still the bow didn't line up.  Fortunately, without even unscrewing anything, Daddy was able to shave off enough wood from the front end of the chine panel with the circular saw to make it squeeze into place at the bow.  Whew. 


And here is the nicely fitted bow!  Once the epoxy mess is all sanded and shaped and fiberglassed, it'll look like a streamlined, well-constructed bow, worthy of a ship's figurehead. 


Here's a shot of the skeg - the brass strip hasn't been attached yet, but will be soon.  There is much sanding ahead of us, and then fiberglassing, and then I think, just maybe, we'll finally flip this boat over and start work on the seats and deck and everything else on the insides!

Sunday, September 25, 2011

Back in Action - September roundup

We basically took August off due to vacations, heat (the epoxy hardens super fast in hot temperatures, meaning you have to work fast and it's hard to clean up), and bugs (mosquitoes biting us and lovebugs loving the epoxy liquid as it dries - we have all kinds of fossilized bugs in our boat!), but now we are back to work and moving along at a nice clip. The hull is almost complete (minus fiberglassing and finishing touches).


Here is the curly maple lumber we used to make the skeg. In order for the skeg to fit the curve of the bottom of the boat, we used an ingenious device: pencil and a block of wood.  We drew a line on the board, and once we cut that line, it fit perfectly to the bottom of the boat. The skeg is two pieces of curly maple to add width at the base.  After we had one all cut out with the tail end how we wanted it, we just traced it onto the other piece and cut out a matching piece, then glued them together.


Here's the skeg with glue drying - no nails or screws to hold it together.  After the glue had dried, we tapered it so that it is narrower at the top and wide at the base.  Then Daddy had a brass strip pre-drilled and we fitted this onto the top of the skeg and pre-drilled into the wood.  The brass strip will be attached to protect the skeg from wear and tear on sand, shells, etc when it's beached.  We sanded down the whole skeg nicely and glued it to the bottom of the boat before we finished the side panels - it's hard to crawl under the boat, but it's about to get much harder once the sides are all glued on.  We also filled the pre-drilled holes with liquid epoxy, and then we'll pre-drill again so that the screws that will have direct contact with the water will only be in epoxy and won't be touching any wood - no chance for water to get into the wood.


Dry-fitting the side panels. Once we had these shaped right, which was much harder than first imagined, we went ahead and screwed them onto the stringers and frames temporarily and then pre-drilled holes to be used to permanently glue on the sides.


Shadowfax supervises.  (Actually she doesn't like to be 5 feet away behind the gate in the backyard.  She would much rather be tied up right next to us.)


Again dry-fitting the sides and chines.  The side panels are the at the top of the boat and the chine panels are the middle panels that fit between the sides and the bottom.
We have completely glued the sides on and the two short sections of chine panels are glued on.  The sides were scarfed to make long panels that run the whole length of the boat, whereas the chine panels are each being connected with a butt block - a small piece of plywood that is glued to the inside of both panel sections where they meet.  We have made our butt blocks and are just waiting for a non-rainy and not-too-hot evening to glue on the long chine panel sections, and then the hull will be complete!

Sunday, July 31, 2011

June

Attaching the stringers was an adventure in patience. I did not relish this part and am glad we're finally past it, although there is more to come that will be very similar...
After bending the wood we fit it into the notches and had to cut the ends to meet up with the bow at the right angles. This is tricky when you haven't had geometry since 7th grade, and when you were never good at geometry to begin with! Trying to visualize how two pieces of wood will meet up if you cut one at a certain angle is not in my grasp, so Daddy figured most of this out. Only one spot didn't come out right, and it was simply remedied by adding a little chunk of wood between the stringer and the notch in the bow (the stringer got cut too short, so it didn't come up to meet the notch). In the picture you can see where the extra piece of wood is on the left side between the stringer and the bow.

Once the stringers were glued and screwed into place, we planed them down to the correct angles so that the bottom, chines, and sides will fit. The stringers are where the bottom, chines, and sides meet and what they are attached to, along with being attached to frames. Planing with Brian's electric planer is fun, lots of sawdust shoots out and it does the job fast. Just have to be careful to keep planing everything evenly and not to hit the frames as you pass by.

Then we went across with the belt sander for fine tuning, checking the angles often with scrap plywood to make sure the panels would fit well when they are ready to go on.

More June

A rough approximation of the bottom. A nice scarfed joint (where the pieces of plywood come together). Scarfing is fun - more to come in July.

Cutting out the hole for the centerboard. This was sort of tricky to figure out exactly where to put since we couldn't just go underneath the boat and draw lines around the edges of the case. We were careful to cut inside the lines and then just had to go back many times to slowly widen the hole until it fit snugly onto the centerboard case.


Once we got the centerboard hole cut and fit, then it was time to shape the bottom and attach it!