Sunday, December 11, 2011

12-5.

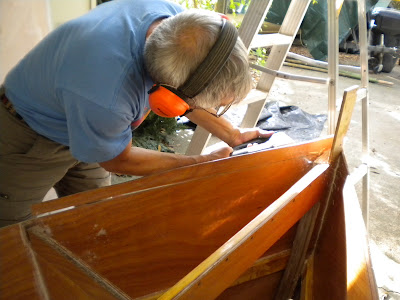
This feels like real progress!!  Last weekend we finally flipped the boat over.  Daddy prepared by unscrewing all of the legs from the strongback (ladder on the floor), then we laid out burlap and boat cushions to protect the hull, and brought over one more strong body to lift the boat.  Carried it outside and turned it over.  It was a lot lighter than we were expecting, which is good.  


We unscrewed the legs from the frames, and got it looking almost like a real boat.


She is very wide - my dad calls her a tub.  We'll see what it feels like in the water.  Here you can really see what the insides look like now with the frames that we started construction with, to the seat supports and stringers running the length of the boat, the centerboard case, and the side, chine, and bottom panels.


There is much sanding in our future - this area between frames one and two is open, so all the messy epoxy has to be cleaned up and looking nice and smooth before we paint.  The mast will come down to the mast step towards the front of this area.  In front of frame one (the big piece with a hole in it) will be a compartment with an access port, and a deck over the top.


Once we were finished admiring, we carried the boat back into the carport and rested it back on the strongback, padded with burlap bags.


The bow seems really tall - I think it should have a figurehead.


We cut off the remaining piece of plywood sticking out of the bow and cut down the side panels flush with the top of the frames.
An exciting weekend!

Tuesday, December 6, 2011

End of November/Beginning of December

Still working on finishing up the rudder, rudder stock, and tiller.  Adding coats of epoxy, sanding, adding more epoxy, fiberglassing, etc. 
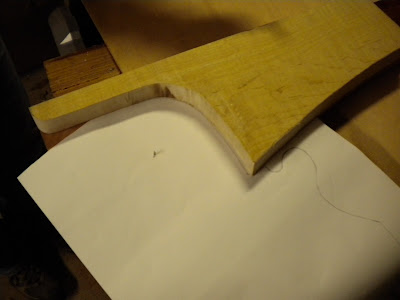
Messed up on the rudder stock here while trying to save fiberglass - good thing we caught it before we glued it down - I traced the rudder stock, then for some reason had to re-trace, leaving a sharpie mark down the middle.  That would've looked great!  We just traced it out on a clean piece, and have avoided any more rogue sharpie marks.  


We've contacted a sail maker and a local carpenter for the mast.  Updates to come.  In the meantime, while you're waiting for the next big post, coming soon with major updates(!), here is a cute picture of Shadowfax cozy under her giraffe blankie.  She turned a year old around Thanksgiving.


Wednesday, November 23, 2011

11-21 (more lead!) and 11-23.

Melted lead from Jim Wells Tires (the things they use to align car wheels).  We just guessed on how much we needed for the hole we had cut out in the bottom of the rudder.  (Oh yeah, this is another thing that was omitted in the plans - an uphaul rudder will just float up in the water without weight in it, so we had to make a hole and add lead to the bottom on the rudder, like we did in the centerboard).

If you can't tell, I really enjoy melting lead.  


And a video: we poured the lead into a piece of scrap wood, with the same size hole as in the rudder.  We  were trying to avoid any burning of the rudder, because as you can see after the lead is poured in there is lots of smoking, which is wood burning.


The next day (lead was cool), Daddy popped it out of the scrap and into the rudder - and it fit well.  There was a little bit of space, so we filled it with liquid epoxy mixed with red cedar dust.  


Tonight (23rd), Daddy painted the tiller and rudder stock with epoxy - for these pretty woods we are using a special hardener that stays especially clear to show off the wood!  He also went ahead and fiberglassed the rudder.  That will be cleaned up once it's all dry, and they'll all get more coats of epoxy.


11-20.


Sanded the top of the rudder down to make final adjustments for it to fit nicely into the rudder stock. 


More sanding on the rudder and stock.  Tapered the leading and trailing edges of the rudder (first with planer, then belt sander, last by hand).  Used general guidelines from the Blue Tang since there was no mention of doing this in the Truant plans.


 Glued the rudder stock together.  Used a few screws to hold it in place along with plenty of clamps.


The set of red cedar and curly maple pieces - tiller, stock, and rudder.  Before epoxy.

Thursday, November 17, 2011

11-17.

Redesigned the rudder.

Good thing we've learned from previous encounters with these bad plans to draw or cut out parts on something other than the piece of wood we'll actually be using.  We drew the rudder, following the plans exactly, on a piece of thick white paper.  Then we put the paper rudder with the rudder stock and spacer, and lo and behold, nothing matched up.  
So, thinking that of course we probably don't know what we're doing, just being amateurs, we triple checked all of our measurements.  There were a couple problems stemming from inexperience or mismeasuring, we presume. 
1. Tiller was about 10mm too short - this was an easy fix.  We just cut off 10 more mm of red cedar away from the center maple piece so that the back end of the tiller sticks out of the rudder case far enough, making the tiller a bit shorter, but that shouldn't really matter.
2. Rudder stock spacer was a tiny bit too long, but that will get sanded when we're all done.  Also, we had to cut out more of the curve in the spacer because the point where our pivot bolt will be to the edge of the spacer was about 10mm short.  (Supposed to be 65mm, and ours was about at 55, depending).


Then it was time to tackle the f-ing mess (not our mess).  The top of the rudder did not fit into the rudder stock!  With the pivot holes lined up, the top of the rudder was overlapping the spacer inside the stock - which does not work with two pieces of wood - one cannot overlap another!!  If we moved the pivot hole in the rudder so that we could actually pivot it around inside the stock, it wouldn't match up with the stock on the outside edge this time.  It's hard to explain, but basically when the rudder is down when sailing along, it fit fine, but when it is raised (kicks up if you hit bottom or an oyster bar) the rudder would hit the stock at about 45 degrees or less, so the rudder would still be sticking way down into the water - but it should be at about a 90 degree angle with the stock so that it won't still be hitting things in the water.  Additionally, the knob called for on the plans where the uphaul rope should go wasn't working into the design well, so we decided to chop that off and move the uphaul back on the rudder some to gain more leverage.

Above: see how the pencil line is being covered by the piece of wood - that's the theoretical rudder overlapping with the spacer - impossible.

Below: The rudder forced to pivot up to 90 degrees - in order for this to be possible, had to move way away from the pivot point, actually to past the top end of the rudder - but wait, you say, there's no wood there to put a bolt through.  That's exactly right.

Below: The rudder from the plans over our redesigned rudder.  The bottoms are lined up, showing how the plans rudder (pencil pointing to it) is way too short with the pivot hole waaaaaaay off.  

So to redesign the rudder we took a fresh piece of paper, keeping the same lines and measurements on the bottom and sides of the rudder.  Then we put the piece of paper in between the stock and spacer and lined up the trailing edge of the rudder with the end of the rudder stock.  We then stuck a nail up through the handy pilot hole we had drilled through the epoxy for the bolt, and stuck that nail through the paper rudder as a pivot.  Then we pivoted the paper rudder along until it was raised, where we were able to draw the outline of the spacer onto the paper to show where the rudder will stop when it is raised and comes in contact with the stock spacer.  This worked really well, and we drew a nice curve along the inside of the spacer on our paper for the top part of the rudder.

From the new paper rudder, we transferred the rudder onto a piece of scrap plywood, cut this out and tested it with the entire rudder stock and spacer before actually drawing and cutting anything on our real rudder.  The plywood test rudder worked perfectly, so we traced it onto our cedar and maple strips and cut it out!  Hoorah, it fits and works properly.  We are awesome boat builders.  And we're never buying John Welsford plans again - if we pay for plans, we feel that we should be able to follow the plans as they are written and build a well-designed boat.  We shouldn't have to be discovering errors and figuring out how to change them to make a boat fit together and float!  


Tuesday, November 15, 2011

11-14.

We worked on the rudder, rudder stock, tiller, and hull yesterday.  


Glued the rudder together - red cedar and curly maple.  We had to make an emergency trip to Brian's last week to straighten up our strips of red cedar.  They weren't square because of the old, sagging saw that we used to rip them.  Fortunately, we were able to run both sides of each piece of wood through a table saw to square them up.  Then they finally fit together tightly, although the rudder might be a tiny bit narrower than called for in the plans... but we're really good at adapting and changing the plans by now!

I don't know why I am so utterly unamused by the soon-to-be rudder!  It's going to be a beauty!
(It could be the mosquitoes - they're really good at biting my neck when I have epoxy-covered gloves on, it's like they know I can't slap them.  But I cannot complain about two or three mosquitoes in November because it is much better than freezing my fingers and toes in Minnesota).


Filling the holes in the rudder stock with epoxy.  There will be a steel tube with a bolt in it here to act as a pivot for the rudder to move up and down.  Just like we did with the centerboard, this prevents any wood-water contact because we'll drill the hole for the tube through the epoxy.


Here is one of our rookie mistakes - when we put together the tiller, we forgot that the base fits into a 25mm gap in the rudder stock (the width of the piece of maple).  We glued the outside pieces of cedar all the way to the back end of the tiller, then realized that we had to get rid of that cedar.  Fortunately, we have a Japanese hand saw, which is awesome.  We just cut of the blocks of cedar, and once the rudder stock is together, we can sand the base of the tiller to fit in.  


We also cut out the blocks of maple that are spacers inside the rudder stock (wood that separates the two pieces of cedar so that the tiller and rudder can fit in between).  We sanded the tiller more - giving it nice rounded edges to make it more comfortable and nicer looking, and painted it with liquid epoxy - it is so pretty now!  And we sanded, washed, and epoxied the hull again.

Tuesday, November 8, 2011

11-7.

 Spent the afternoon making the tiller.  We had already cut out the three pieces - drew out the tiller from the plans on curly maple, then traced the maple outline onto two pieces of a red cedar board.  With the three pieces clamped together, we sanded them until they were all the same size and shape.


With all three pieces, the tiller is too fat for a comfortable grip when steering.  So we sent the two pieces of cedar through the planer.  As I pulled them through the planer, Daddy cranked the blade lower and lower, thus shaving off more wood evenly towards the ends of the boards.  Now the tiller is tapered down to a comfortable width for holding onto (photo later).    


Gluing the tiller together!


Setting all the clamps was tricky - with all the glue in between, the pieces of wood want to slide every which way.  We tried clamping the two ends first, then the middle, then working in from each end, but as soon as we added a clamp near either end, the outside pieces of wood would squish up or down or backwards or forwards, leaving uneven edges.  We ended up putting two screws into the back end of the tiller, one on each side to hold it in place so that we could get the clamps all set with the pieces of wood all lined up perfectly.  That worked well.


Of course I ended up with epoxy all over my gloves, and then proceeded to touch the wood all over while trying to hold it together while we tightened clamps, but then we realized we were going to be gluing the little blocks of wood under the clamps to the tiller, so we had to put slips of wax paper under each wood block.  The wood blocks just keep the clamps from damaging the wood of whatever you are gluing.  


Right before we starting gluing, we noticed a little hole in the outside of one of the cedar pieces.  We stuck a screw driver into the hole to punch out any loose wood, and the hole turned out to be deeper than expected.  We can't have a hole in the tiller (or anywhere else!), so after we finished gluing the tiller pieces, we used a little left over liquid epoxy to mix up a filler for the hole.  By mixing in wood dust into the liquid from the wood that you're filling, you get a filler that matches the wood color.  So we have a nice cedar filler for the hole that will blend right in with the rest of the side of the tiller - hopefully.


Tonight we were planning on gluing the rudder strips together so that we could get on with drawing and cutting that out, but the saw we used to rip the pieces cut them at weird angles because the saw blade sags just a tiny bit (it's a really old saw), so we have to try to fix that before we can put the rudder together.  Right now when the pieces of the rudder are pushed together, there are little gaps and some pieces want to be tilted at a slight angle to meet the edge of another piece.